I’m putting together a 500 – 750 point Tyranid army for 40K and decided to start off with this.
This is my first encounter with finecast and while I can appreciate the sharpness of some of the detail overall I’m not too impressed.
Granted resin is easier to clean up than plastic or lead but there was just so much to clean. The gun on this model looks a bit droopy but nothing as bad as some parts I’ve seen in other finecast packs. This just does not feel like good value for money. At this price for a single moderately sized figure I’d just expect something a little higher quality. Ok… prices in general are quite a shock. The last time I bought a blister of 5 lead figures it cost £3.50. At the time that seemed quite exorbitant as it wasn’t that long before that £1.95 was a typical blister price.
Anyway, here is the figure glued and primed. Next time I would stick on the arms after painting the body I think… there’s going to be some hard to reach places.
Still haven’t decided on a colour scheme yet so think its going to stay white for a little longer.

So after much deliberation I have decided to take the Coconut crab as inspiration. A rather unpleasant looking critter but quite colourful.
")
")
")
To start off with I have applied some basic colour washes to the carapace, body and weapon. From these I plan to build up the rest of the colouration using glazes and drybrushing. Let’s see how it goes.
")
The first attempt didn’t turn out too well. The decoration looks too ‘fake’ and painted. It was hard to get the dots of colour just right at this scale and the lines are way to thick.
")
Time to try again…. so I over painted the carapace with a very dark blue mix. Actually, this looks pretty good and will be my backup colour scheme but for now I really want to paint a crab.
")
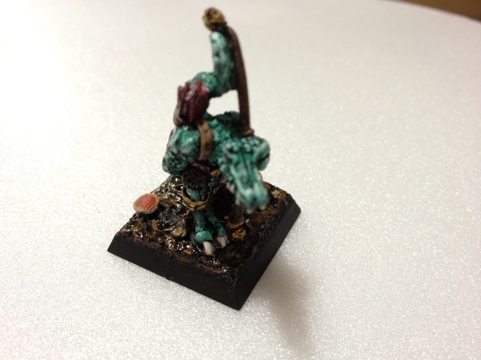
So now my second attempt at colouring the carapace using several layers of brown glaze. Not sure if it needs just a touch more colour before adding some spots and stripes a final wash then a gloss varnish (once the rest of the figure is painted). Two outstanding questions I have for myself is how to introduce the bright blue colouration of the underside of the body (the chest carapace? the chest exoskeleton?) and also what to do with the weapon. I’m currently thinking of trying to make the weapon look like some kind of aquatic construct…
")
I spent some time adding spots and a few stripes back onto the carapace. It worked a bit better this time. I think the next time I would increase the number of spots and have less highlighting on the top carapace section. I experimented with blue claws but I’m not happy with the look. They’ll get painted white like the teeth. The gun has had a light green wash but will get a darker wash also. I still haven’t got an answer as to how to get the light blue of the coconut crab’s underbelly represented on this figure.
")
")
The last stages were a very thin yellow glaze over the carapace, a black glaze to enhance carapace shadows between segments, 3 increasingly dark green glazes on the gun and picking out the highlights on the weapon. The claws and hooves were painted dark blue/black and then given rather slapdash grey highlights. I also had used a cocktail stick the previous evening to try applying some extra detailing dots of colour to the tail.
The base was an interesting experiment (and should really have been done earlier) thin PVA applied around the figure with a cocktail stick and a sprinkling of uncooked cous cous and some small pieces of wine bottle cork. It was then painted with a thick light grey wash followed by a thin sepia glaze and then picking out a few individual random pieces with various browns, yellows, oranges and grey to represent a pebble beach. Finally the carapace was given 3 coats of gloss varnish and the weapon, hooves and claws one. The rest of the figure was matt varnished. The base isn’t varnished just yet and might get gloss or matt I haven’t decided.
")
")
")
")
Update (11/06/12) : After lots of feedback I have changed the colour of the Hive Guards weapon to blue. Looks pretty good I think.


")
")
")

")
")
")
")
")
")
")
")
")
")
")
")
")